frename guide
Everything frename does, in detail. New here? Start with the overview and download frename.
The window
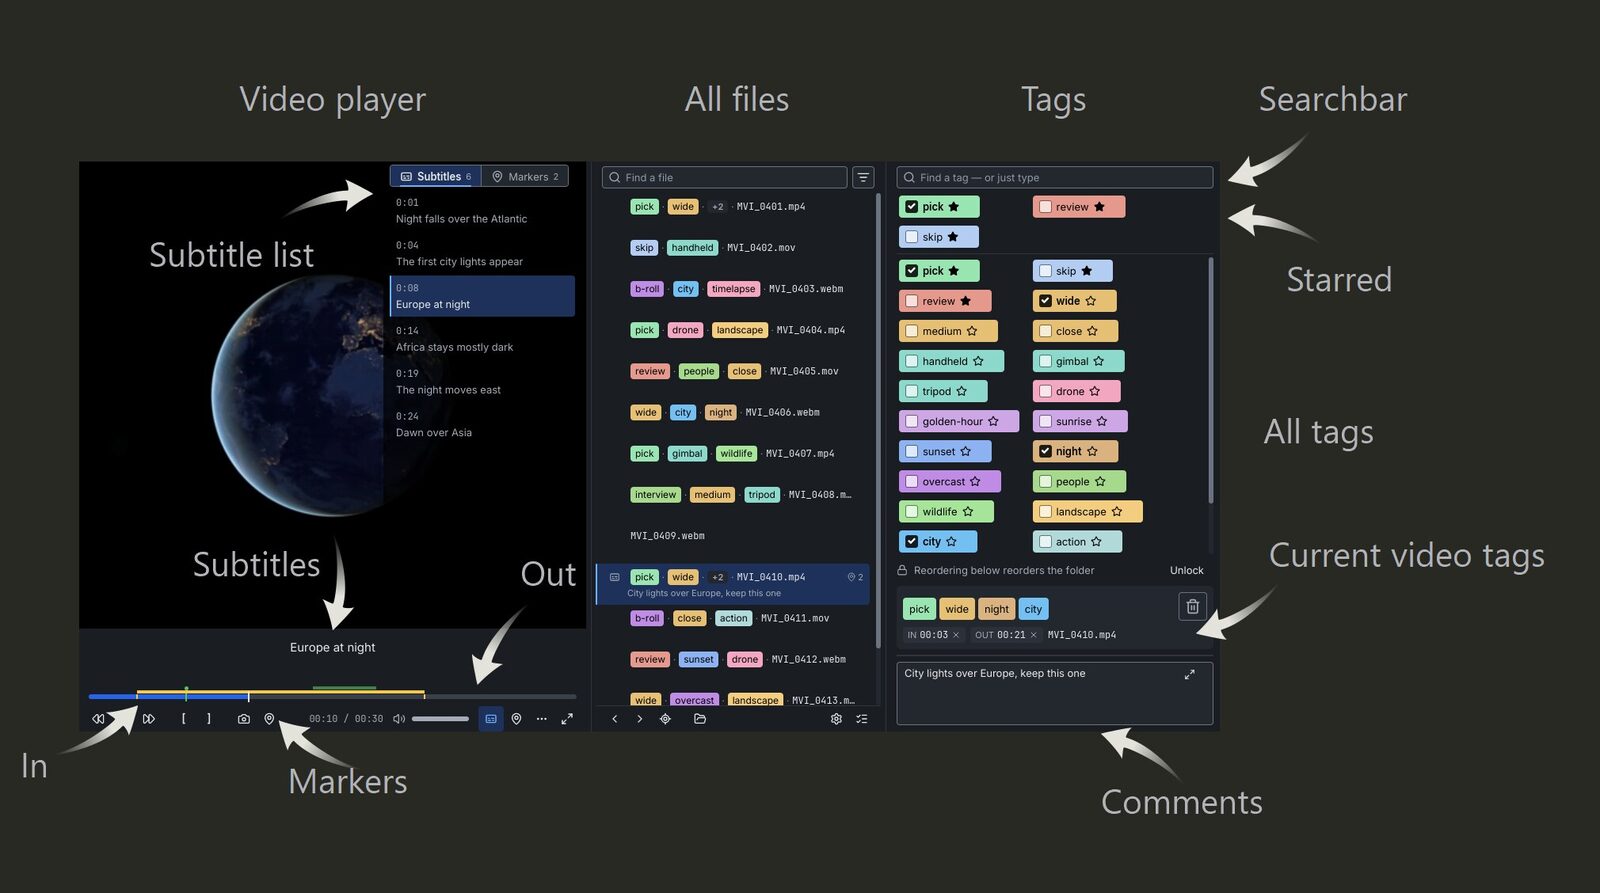
The window has three columns. On the left is the video player with the subtitle and marker lists. In the middle is the list of files in the folder. On the right are the tag search, your starred tags, all the folder's tags, the new file name (drag its tags to reorder them) and the clip's comment.
How a session goes
- Open a folder with the Open a folder button under the file list, or drag a folder onto the window. The installed Windows version also adds "Open in frename" to the right-click menu of folders in Explorer.
- The first clip starts playing.
- Tag what you see.
- Press
[and]to mark the usable part, andF2at a moment you want to find again. PressF2again right away to name the marker, thenEnter. - Type a comment for the clip, press
Escto leave the comment box, and pressPageDownto go to the next clip. frename renames the clip you left and saves its markers. - On Windows, drag finished clips from the list into Premiere Pro. frename saves each clip first, so it arrives with its new name and everything you marked. Nothing is moved.
The next time you start frename, it opens the same folder at the same clip, two seconds before where you stopped watching. This guide has more ways to open a folder or a single clip.
Keyboard shortcuts
Files
| Key | Action |
|---|---|
PageDown |
Next file (renames the file you leave) |
PageUp |
Previous file (renames the file you leave) |
| Double-click a file | Rename it by hand: Enter renames, Esc cancels |
Ctrl+click a file |
Add it (and the open one) to a selection, or drop it if already selected |
Shift+click a file |
Select every file between it and the last Ctrl-clicked one |
| Right-click a file or the open file's name | Menu: show it in Explorer, copy its full path or its name (Esc or a click outside closes it) |
F11 |
Show the open file in Explorer, with the file selected (Linux: in the file manager) |
Shift+F11 |
Copy the open file's full path (D:\footage\clip.mp4) |
Ctrl+F11 |
Copy the open file's name (clip.mp4) |
Escape |
Leaves a selection made with Ctrl/Shift+click (batch mode); otherwise clears the file and tag searches |
Tags
| Key | Action |
|---|---|
↑ ↓ ← → |
Move the selection in the tag grid |
Shift+Space |
Tag or untag the file with the selected tag |
Any letter, Backspace |
Type into the tag search |
Enter |
Add the typed tag, or the selected unsaved (○) tag, to the folder's tags |
Delete |
Delete the selected tag from the folder's tags |
Escape |
Clear the tag and file searches, or leave a Ctrl/Shift+click selection first if one is running (see Files above) |
Ctrl+C |
Copy the file's tags (and its new name to the clipboard) |
Ctrl+V |
Replace the file's tags with the copied ones |
Ctrl+Z |
Undo |
Ctrl+Y or Ctrl+Shift+Z |
Redo |
| Middle-click a chip in the file name | Untag the file |
Video
| Key | Action |
|---|---|
Space |
Play / pause (or click the picture) |
F1 |
Back 10 seconds |
F3 |
Forward 10 seconds |
Alt+← / Alt+→ |
One frame back / forward (pauses; hold to keep stepping) |
Home |
Go to the start of the clip |
[ |
Set the in point |
] |
Set the out point |
F2 |
Add a marker; F2 again within a second and a half, or on a marker, names it |
Hold F2 |
Mark a range: from where you pressed to where you let go |
Shift+F2 |
Delete the marker under the playhead |
Ctrl+F2 |
Describe the marker under the playhead with AI |
Shift+F1 / Shift+F3 |
Jump to the previous / next marker |
Shift + drag the progress bar |
Snap to the nearest marker |
Alt + drag the progress bar (paused) |
Mark a range |
F12 |
Save the current frame as a JPEG next to the video |
F5 |
Fullscreen on / off (or double-click the picture) |
Ctrl+Alt+← / Ctrl+Alt+→ |
Rotate the clip 90° left / right |
Escape |
Leave fullscreen |
Settings
| Key | Action |
|---|---|
Ctrl+Tab / Ctrl+Shift+Tab |
Next / previous page |
Escape |
Close Settings (while you remove or replace a key, Esc cancels that first) |
This guide explains which keys a text box takes while you type, and everything else in detail: tags, markers, comments, search, subtitles, batch mode, Describe with AI and Settings.
Opening folders and resuming
Besides the Open a folder button and dragging a folder onto the window, the installed Windows version adds "Open in frename" to the right-click menu of folders and videos in Explorer. On Windows 11 it is under "Show more options". To start at one clip, right-click the Open a folder button to pick the file, or drag the file onto the window. Its whole folder opens with that clip selected.
The next time you start frename, it reopens the last folder and clip. Opening any other folder
again, even after a restart, returns to the clip you last viewed in it. A clip you open again
continues two seconds before where you stopped watching, with a note that says so. Press Home
or click the note to start it over. A clip watched to the end starts over, at its in point if it
has one.
On Windows you can drag a clip from the list into Premiere Pro, Explorer or any other program. frename saves the clip first, so it arrives under its new name with everything you marked. Nothing is moved.
When a text box has the cursor
While a text box (tag search, file search, comment) has the cursor, it takes the keys it needs:
arrows, Delete, Space, Home (except in a search field while the "Resumed at" note shows),
Enter, Ctrl+C, and in the comment box also PageUp / PageDown.
Press Esc first to give the keys back to the app. [ and ] set in and out points, except while
you type in a marker's name. The F-keys always work, and so do Ctrl+Alt+← / → except in the
comment box and a marker's name.
Recovery after a crash
Your unsaved work on the open clip (tags, comment, in/out points, markers) is also kept in a small
recovery file, a second after each change. If frename or the computer stops without closing it,
the next start applies that work, opens that clip and says so. If the clip changed meanwhile, it
is left alone: the message names the folder (recovery/kept, next to the settings) with a
readable copy of your work to retype from. Undo history is not restored.
Undo
Undo (Ctrl+Z) covers tagging, untagging, adding, deleting, starring and reordering tags,
pasting, in/out points, adding, deleting, coloring, resizing and naming markers, rotating a clip,
the comment (what you type before leaving the box is one step), a rename by hand (double-click),
Sync up, Sync down and the lock, and the rename when you leave a clip. The history is shared by
the whole folder, so after moving to another clip the first undo goes back to the clip you left
(a note says so) and the next one undoes its last change. In batch mode only markers and
rotation are undone. It does not cover batch actions; opening a folder or running a batch
action clears the undo history.
Tags
Each folder has its own tags, kept in a .frename file inside the folder. The file travels with the
footage.
A folder without one starts with a set for travel and documentary work: pick, skip, review,
wide, close, drone, golden-hour, people, wildlife, and more.
- Star a tag (☆) to keep it in the starred row above the grid.
- Search: type anything to filter the tags.
- Add a tag: type a new name and press
Enter. - Unsaved tags: a tag that is already in a file's name but not in the folder's tags shows as
unsaved (○). Select it and press
Enter, or click ○, to add it. - Order: the order of tags in the tag panel is the order they get in file names. Drag chips in the file name to change it, or drop a chip on 🗑 to untag it. When the file's order differs from the panel's, 🔓↑ copies the file's order to the tag panel and 🔓↓ puts the file's tags in panel order. When they match, 🔒 keeps them in step: reordering one reorders the other. Click 🔒 to unlock (it shows 🔓) and again to lock.
Markers, comments and in/out points
The progress bar shows what you have noted about a clip:
- Markers:
F2or the pin button marks the moment under the playhead with a pin in the marker's color. The marker list button opens the marker list over the picture (in fullscreen too; it shares the place with the subtitle list, with a tab for each; an empty list has an Add button). Click a marker's row to name it, its dot to pick one of Premiere's colors, ✕ to delete it, and its time to jump there. Markers are saved inside the video when you leave the clip, and Premiere Pro shows them on the clip with their name, length and color after you import it (re-import a clip it already has: Premiere reads the markers once). Markers Premiere wrote are shown too and kept. If a clip is open in Premiere, its markers may not save: the file gets a red ✕ in the list, and frename tries again when you next leave it. While the playhead is on a marker, its name becomes the pin's head; click it to rename the marker. Settings → Saving → Markers and ranges can keep them in the comment instead, one line each (0:41–0:47 — Lion): in frename they still work as markers. With comments in text files (.comment.txt), the lines are written as you edit (a file that cannot be written gets the red ✕ and frename tries again at your next change); with comments inside the video, when you leave the clip. A clip whose markers are still inside the video shows them; changing one moves them all into the comment. - Ranges: hold
F2(or the pin button) while the clip plays to mark a stretch (0:41–0:47 — Lion); a band just above the bar shows it, and overlapping bands stack. Drag the handles at the ends of the current range to change it (Shiftsnaps), drag them together orAlt+click the band to make it a single moment again, and click a band to play just that stretch. - Describe a marker with AI: ✨ on a marker's row, or
Ctrl+F2on the marker under the playhead, names an unnamed marker and adds what happens at that moment to its comment, shown under its name, keeping your own name and comment. ⊗ stops it; it uses the Describe with AI settings and costs under a cent per marker with Haiku, a few cents with Opus. - Frames:
Alt+←/Alt+→(or the buttons next to play) step one frame back or forward and pause there; paused, the time shows milliseconds (00:10.250), andF2marks that exact frame.F12or 📷 saves the current frame as a JPEG next to the video (clip.mp4.snap.00-01-05-250.jpg) and showsFrame saved. - Rotation: ↺ / ↻ (
Ctrl+Alt+←/→) turn a clip shot sideways 90° at a time. Only the rotation flag inside the MP4/MOV changes, right away: the picture is not re-encoded. Premiere Pro shows the clip turned when it imports it. A clip Premiere imported before the turn keeps its old orientation until you clear its media cache (Media Cache ▸ Delete in its preferences) and import it again. Other formats cannot be turned. While you write a comment the keys stay with the text. IfCtrl+Alt+←/→turns your whole screen, switch off the graphics driver's rotation hotkeys or use ↺ / ↻. - In and out points:
[and]mark the usable segment, highlighted on the progress bar. By default they are saved inside the video as a marker that Premiere Pro turns into a subclip. Settings can keep them in the comment instead, as a line after your own text (In/Out: 00:01:05.250 – 00:02:10.000), which the comment box does not show: change it with[and]. - Comments: free text per clip. By default it is saved inside the video, where Premiere Pro
shows it in the Description column and finds it by search. Settings can keep it in a
.comment.txtnext to the video instead. The file list shows the first line of each comment. While comments are inside the video, frename tags a clip you commented "Commented" (Settings can rename or turn off this tag); an AI description alone does not count. Drag the bar above the comment box to make it taller or shorter; ⛶ in its corner gives the comment the whole panel, and ⊡ brings the tags back.
Some formats, such as mkv, cannot hold comments, in/out points or markers inside them; for those,
frename keeps the comment, with the in/out line, in .comment.txt whatever Settings say, and the pin
button is off. mp4 and mov hold everything.
.comment.txt files and subtitles are renamed together with their video.
Finding files
- Search the file list by name or by comment: type words, and a file is listed when each word is in its name (tags included) or in its comment (your text, the AI description, marker lines), in any case. A file found by its comment shows the matching line under its name with the words marked. While comments are still loading, those files match by name only, and a line says how many are left.
- Filter the list to files that are untagged, have subtitles, a comment or markers: the filter button at the right end of the search bar opens a menu (tick as many as you like; Show all clears them) and shows how many are on. A file with subtitles shows the subtitles icon, and a file with markers a pin and their number.
- The list shows only videos (mp4, mov, mkv, avi, webm, and other common formats), oldest first.
Subtitles
A .srt with the same name as the video (clip.srt for clip.mp4) is shown under the picture.
The CC button opens a list of every line; click a line to jump to it. In fullscreen the subtitles
are shown over the picture, and CC opens the list beside them there too.
No subtitles yet? Check the videos in batch mode and run Generate subtitles (see below).
Batch mode
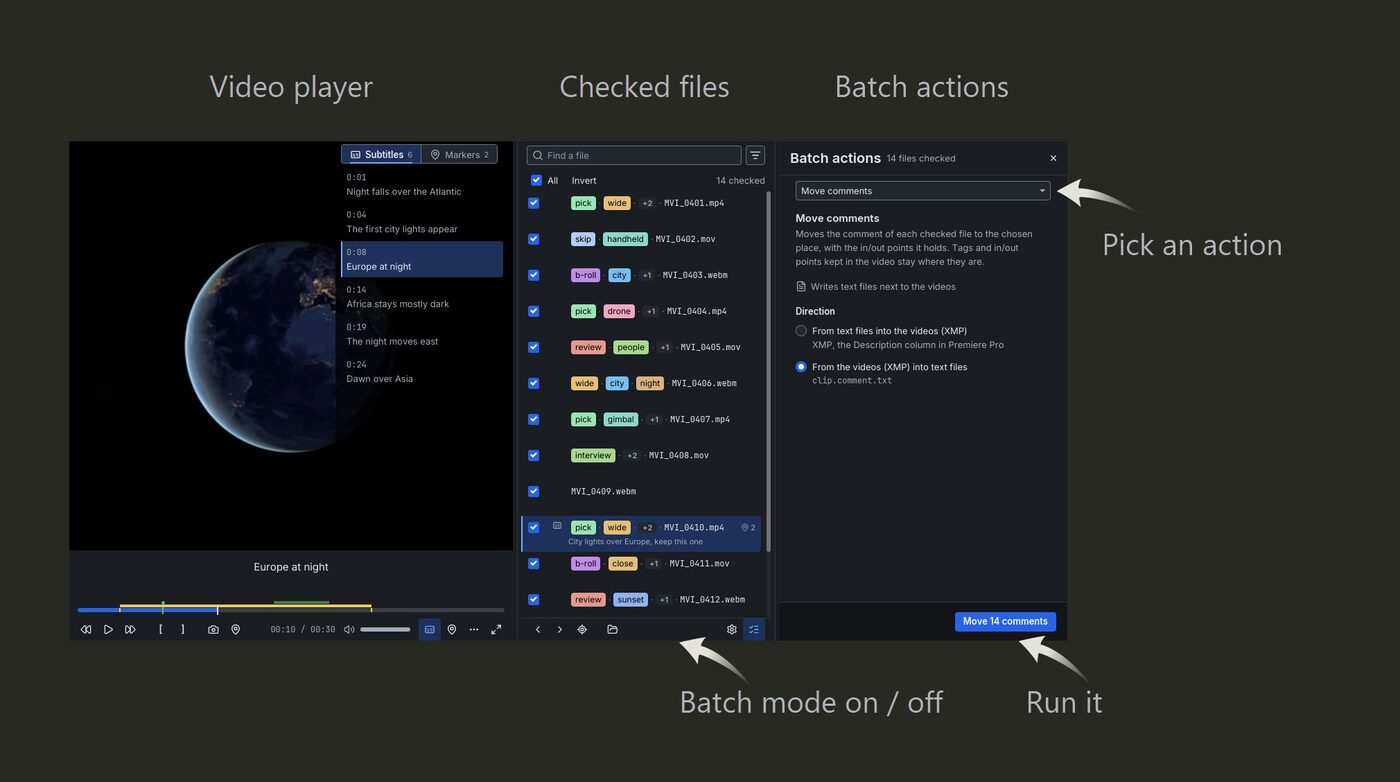
Click Batch actions (the right end of the bar under the file list) to check files in the list (All / Invert) and run one action on all of them, with progress and Cancel. Each file then shows an icon for what happened to it (changed, nothing to change, not done). Drag a checked file to drag all checked files (an unchecked one drags only itself). Esc leaves batch mode, the same as clicking Batch actions again. Batch mode opens with the action you last ran selected, and its own options (e.g. which way in/out points move, or "Replace existing subtitles") as they were then, even across restarts.
Select several clips without the button: Ctrl+click a clip to add it (and the one open before it) to the selection; Ctrl+click a selected clip to drop it. Shift+click a clip to select every clip between it and the last one you clicked with Ctrl (or the open clip, if you have not Ctrl+clicked yet), replacing the selection. Either turns on batch mode with exactly that selection checked, and the clip you clicked stays the one shown in the player. A plain click still opens just that one clip, as always.
Actions:
- move comments between the video and
.comment.txtfiles; - move in/out points between the comment and the video;
- turn comment lines that start with a time (
03:24 — Take 3 — nice light,0:41-0:47 — Lion) into markers, or copy the markers into the comment as such lines. What follows the name after a second—or--(not a plain-) goes into the marker's comment, which Premiere shows and frename keeps but does not show. A marker's color is a word in brackets after the time (0:41 [red] — Lion; green, the default, has none). The moments of an AI description become white markers too (with their length) and stay in the description. One marker per moment: a comment line for a moment that already has a marker renames it. Running either of these actions on a clip with doubled markers repairs it and lists the clips it merged in (different names stay asname — other name, which reads back as a name and a comment). Markers made by other tools that Premiere would not recognise are left alone; - rotate the videos 90° right or left or 180°, or reset them to no rotation (this also removes a turn a phone recorded);
- tag commented videos with "Commented" and untag the rest;
- put the tags in every name in tag panel order;
- add or remove the space after each tag, as set in Settings;
- read every file again (use this if the list looks out of date);
- describe each video with AI (see below);
- generate subtitles from the speech (see below).
Describe with AI
Describe with AI writes what happens in each checked video, and when: a one-line summary and
time-ranged segments, even for clips with no speech. frename sends up to 60 frames per clip, picked
where the picture changes the most, and the video's .srt, if there is one, to Claude (Haiku 4.5 unless you pick Sonnet
or Opus in Settings), and puts the answer at the end of the comment, below your own text, which is
never changed. Before you run it, the panel shows how many videos will be sent, the price (with
Haiku, about $10 per 1000 one-minute clips) and how long it takes. Videos already described are skipped unless you tick Redo, and so are clips over 30 min.
Cancel keeps what is done. You need your own Anthropic API key: set it in Settings.
The description is part of the comment, in the comment box with your text: edit it or delete it
there like any other text. It starts at a line beginning with AI: and runs to the end of the
comment; a new run replaces only that part and never touches the text above it. Premiere Pro and
.comment.txt get the whole comment.
While markers are kept inside the video (Settings → Saving → Markers and ranges, the default), the segments become white "AI" markers Premiere Pro shows on the clip, and the comment keeps only the summary. A new run replaces the AI markers and leaves the others alone, so give one a color to keep it. With markers kept in the comment, or a format that cannot hold markers, the segments are lines of the description.
When a clip has a lead-in or lead-out around the part worth keeping, the description ends with
the In and Out the AI suggests (Suggested In/Out: 00:00:03.200 – 00:00:11.800). With the clip
open, it shows as an AI pill next to the IN and OUT points; click it to set In and Out to it
(one undo step). frename never sets them by itself.
Generate subtitles
Generate subtitles sends the audio of each checked video to Soniox, a
paid speech-to-text service (about 10 cents per hour of audio), and saves the subtitles next to it as
clip.srt. Before you run it, the panel shows how much audio will be sent and about what it
costs. Under Files to write tick what you want: SRT subtitles (clip.srt, on by
default) and/or a Premiere Pro transcript (clip.premiere.json, for Text panel → Transcript →
Import Static Transcript in Premiere Pro); with neither ticked Run stays off. A video is skipped
only when every ticked file already exists (unless you tick Replace existing subtitles, which
applies to every ticked file), and a video found to have no speech is not sent again. If only one
of the files exists, adding the other is free when the video's transcript was saved earlier;
otherwise the video is transcribed again. When a Premiere transcript was written, the result
lists the files written for each video. Afterwards the panel lists
every video that got no subtitles and why. You need your own Soniox API key: set it in Settings →
Subtitles. Formats such as mkv, m2ts and avi need ffmpeg on your PATH.
Settings
The Settings button (under the file list) opens Settings. Changes apply right away; Close or Esc closes it. It has five
pages:
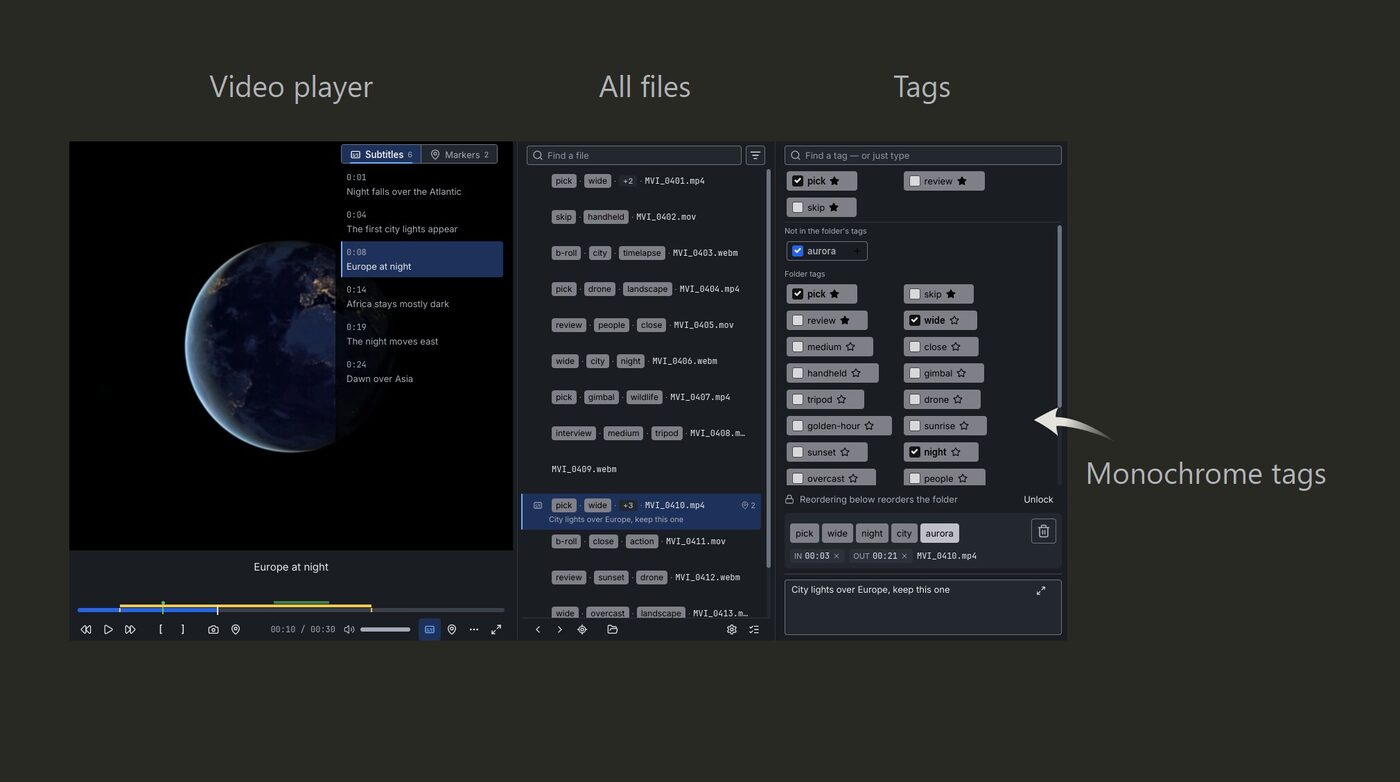
- Interface: the UI language (follows your system by default, or pick English or Russian; more languages are on the way), monochrome tags (a tag you added shows darker, one that is not in your list stays the lighter gray it always was), and playing videos as soon as they open.
- Saving: a space after each tag in file names (
Food. Goat. clip.mp4), and where comments, markers and in/out points are kept: inside the video, or in a text file (comments) or the comment (markers; in/out points as one line,In/Out: 00:01:05.250 – 00:02:10.000). While comments are inside the video, frename can tag the videos you comment ("Commented", or a tag you name). After a change here, Settings offers the batch action that updates the files you already have. - Describe with AI: your Anthropic API key, kept in the system's password store (Windows Credential Manager, macOS Keychain, or a keyring such as GNOME Keyring on Linux), the model (Claude Haiku 4.5, Sonnet 5 or Opus 5, with their prices), the language of the descriptions, and Moments: segments only for what stands out (the default, and the only choice that suggests an In and Out) or segments covering the whole clip.
- Subtitles: your Soniox API key (kept the same way), the languages spoken in your footage, and whether a subtitle is a short line or a whole sentence.
- Updates: Check for updates, then Update and restart when a newer version is out. frename also checks once a day by itself (you can turn that off) and puts a dot on the Settings button when an update is ready; it then opens this page. Nothing is downloaded until you click.
Your files and your data
- Tags live in the file names, and each folder's tag list lives in a
.frenamefile inside that folder, so both travel with the footage. - Markers, in and out points and comments are saved inside mp4 and mov files. Settings can keep
comments in a
.comment.txtfile next to the video instead. Formats such as mkv cannot hold them, so for those frename keeps the comment and the in and out points in the text file, and markers are not available. - frename sends your footage nowhere unless you ask. Describe with AI sends frames and subtitles to Anthropic, and Generate subtitles sends the audio to Soniox, both with your own API key. Your keys are kept in the system's password store. On Windows that is Credential Manager.
- On Windows, frename checks GitHub once a day for a new version. You can turn that off in Settings, and nothing is downloaded until you click Update and restart. The Linux AppImage does not update itself.
Install
Windows 10 or 11 (64-bit): download
frename-win-Setup.exe
and run it. It installs without questions and starts frename. Video playback is built in, so you
don't need to install anything else. Windows may warn about an unknown publisher the first time.
If it does, click More info, then Run anyway. frename keeps its settings in
%LocalAppData%\frename. Uninstalling removes them, but your tags and comments stay with your
files.
If you prefer not to install, use the Windows zip from the
latest release. Right-click it, open
Properties, tick Unblock, unzip it anywhere and run frename.exe. The zip keeps its
settings in its own folder and updates itself too.
If you used the zip of version 0.66 or older, the new frename looks for its folder in Downloads, Desktop and Documents on the first start and offers to import your settings and recent folders. If the folder was somewhere else, use Settings → Updates → Import from an old frename folder…. After that you can delete the old folder, and uninstall GStreamer if you installed it only for frename.
Linux (64-bit, Ubuntu 24.04, Linux Mint 22, Fedora 40, Debian 13 or newer): download the
.AppImage from the latest release, make it
executable with chmod +x frename-*.AppImage, and run it. Video playback is built in, so you
don't need to install anything else. If it says FUSE is missing, run it with
--appimage-extract-and-run. frename keeps its settings in ~/.local/share/frename.
The interface is in English and Russian.